
 Backend Execution - qKnow Open-Source Edition
I. Prerequisites (Required Environment)
Before running the system, ensure the following software and tools are installed:
| Software/Tool | Version Requirement | Recommended Version |
|---|---|---|
| >= 1.8 | 1.8 | |
| >= 5.7.0 | 5.7 | |
| 4.x | 4.4.40 | |
| >= 5.0 | 5.0 | |
| >= 3.6 | 3.6 | |
| >= 16 | 16 |
Tip: After installing
Node.js, it's recommended to set the Taobao NPM registry mirror to speed up dependency downloads. Avoid usingcnpmas it may introduce unforeseen issues.npm config set registry https://registry.npmmirror.com
II. Obtain Project Code (Download and Extract)
Visit the 【qKnow Gitee Download Page】 to download the project and extract it into your working directory.
III. Project Structure
1. Project Directory Structure
├─qknow-framework           # Common configuration module
├─   ├─qknow-auth           # OAuth2 module
├─   ├─qknow-common         # Common utilities module
├─   ├─qknow-config         # Configuration module
├─   ├─qknow-es             # Elasticsearch module
├─   ├─qknow-file           # File management module
├─   ├─qknow-generator      # Code generator
├─   ├─qknow-mybatis        # MyBatis configuration
├─   ├─qknow-neo4j          # Neo4j database module
├─   ├─qknow-pay            # Payment module
├─   ├─qknow-quartz         # Scheduled task module
├─   ├─qknow-redis          # Redis module
├─   ├─qknow-security       # Security module
├─   ├─qknow-websocket      # WebSocket module
├─qknow-module-app          # Knowledge application module
├─qknow-module-dm           # Data management module
├─qknow-module-ext          # Knowledge extraction module
├─qknow-module-kmc          # Knowledge center module
├─qknow-module-system       # System management module
├─qknow-server              # Main startup module
├─qknow-ui                  # Frontend module
├─sql                       # SQL scripts
├─README.md                 # Project introduction
├─QUICKSTART.md             # Quick start guide
2. Frontend Structure
├─qknow-ui                  # Frontend module
├─   ├─public               # Static resources directory
├─   ├─src
├─   |  ├─api               # API interfaces
├─   |  ├─assets            # Images, styles, etc.
├─   |  ├─components        # Reusable components
├─   |  ├─layout            # Layout components
├─   |  ├─plugins           # Plugins
├─   |  ├─router            # Routing
├─   |  ├─store             # State management
├─   |  ├─utils             # Utility functions
├─   |  ├─views             # Page views
├─   |  |   ├─app           # Knowledge application module
├─   |  |   ├─dm            # Data management module
├─   |  |   ├─ext           # Knowledge extraction module
├─   |  |   ├─kmc           # Knowledge center module
├─   |  |   ├─system        # System management module
├─   ├─.env.development     # Development environment config
├─   ├─.env.production      # Production environment config
├─   ├─vite.config.js       # Vite configuration file
IV. Essential Configuration (Database and Service Setup)
1. Create MySQL Database and Import Data
- Create a MySQL database:
qknow_dev - Import SQL scripts:
qknow_20250522.sql,quartz.sql
2. Modify MySQL Database Connection Configuration
Path: qKnow/qknow-server/src/main/resources/application-dev.yml
datasource:
  type: mysql

mysql:
  driver-class-name: com.mysql.cj.jdbc.Driver
  url: your_database_host
  username: your_database_username
  password: your_database_password
3. Create Neo4j Database and Import Data
Step 1: Stop Neo4j Service
- Navigate to your Neo4j installation directory, go to the
binfolder, and execute./neo4j stopto shut down the service.
Step 2: Import Database
- In the
bindirectory of your Neo4j installation, run the following import command:
# Command explanation: --force means force overwrite. If the database doesn't exist, it will be created.
# Dump file: sql/neo4j/neo4j.dump. Note: Replace the path below with your absolute path.
./neo4j-admin load --from=dump_file_path --database=your_database_name --force- Navigate to the
confdirectory in your Neo4j installation, open theneo4j.conffile, and modify the default database name:dbms.default_database=your_database_name
Step 3: Start Neo4j Service
- In the
bindirectory of your Neo4j installation, execute./neo4j startto start the service.
4. Modify Neo4j Database Connection Configuration
Path: qKnow/qknow-framework/qknow-neo4j/src/main/resources/application-neo4j-dev.yml
neo4j:
  uri: your_database_uri
  user: your_database_username
  password: your_database_password
5. Configure Server Port and Access Path
Path: qKnow/qknow-server/src/main/resources/application.yml
server:
  port: port_number            # Default is 8090
  servlet:
    context-path: /app_path    # Application access path, default is empty
V. Knowledge Extraction Tool Configuration (DeepKE) (Deep Learning Model Setup)
The current open-source version uses the DeepKE-cnSchema: Ready-to-use Chinese Knowledge Graph Extraction Framework as the knowledge extraction tool. Please refer to the official documentation for installation. Docker installation is recommended.
1. Modify Entity Type Configuration as Needed (requires modification inside Docker container)
Configuration file path: DeepKE/example/ner/standard/conf/train.yaml
adam_epsilon: 1e-8
data_dir: "data"
do_eval: True
do_train: True
eval_batch_size: 8
eval_on: "dev"
gpu_id: 0
gradient_accumulation_steps: 1
learning_rate: 1e-3 # tips:set 2e-5 for BERT with recommended datasets
num_train_epochs: 3 # the number of training epochs
output_dir: "checkpoints"
seed: 42
train_batch_size: 128
use_gpu: True # use gpu or not
warmup_proportion: 0.1
weight_decay: 0.01
# For StepLR Optimizer
lr_step : 5
lr_gamma : 0.8
beta1: 0.9
beta2: 0.999
# Modify the entity types to extract here
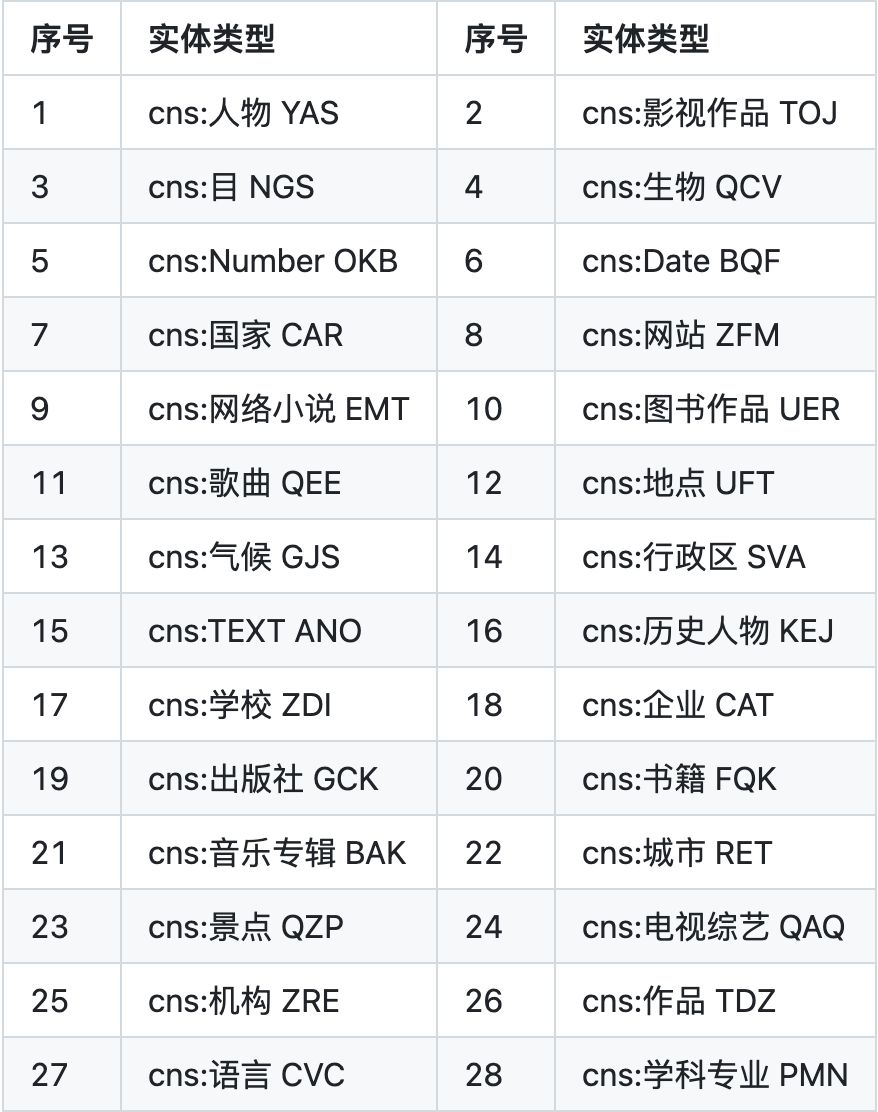
labels: ['LOC','ORG','PER']
# labels: ['YAS','TOJ', 'NGS', 'QCV', 'OKB', 'BQF', 'CAR', 'ZFM', 'EMT', 'UER', 'QEE', 'UFT', 'GJS', 'SVA', 'ANO', 'KEJ', 'ZDI', 'CAT', 'GCK', 'FQK', 'BAK', 'RET', 'QZP', 'QAQ', 'ZRE', 'TDZ', 'CVC', 'PMN']
use_multi_gpu: FalseNote: Refer to the entity types provided in the DeepKE official documentation. If you need to extract other types, you must retrain the model.
Entity Types Supported by DeepKE
2. Modify the Docker Container ID in the DeepKE Execution Script
Path: qKnow/bin/DeepKE/start.sh
#!/bin/bash
# DeepKE.sh

if [ $# -lt 1 ]; then
    echo "Usage: $0 <text>"
    exit 1
fi

TEXT="$1"

# Note: Replace this with your actual Docker container ID
# Tip: It's recommended to test the command below in your local terminal to ensure predict.py runs successfully.
# Test command: docker exec dabea2a436b6 python -u predict.py "text='Singer Jay Chou composed many classic songs, such as \"Dawn\", which is loved by listeners across China.'"
docker exec dabea2a436b6 python -u predict.py "text='$TEXT'"
Friendly Reminder:
DeepKE extraction performance depends on CPU/GPU capabilities. It's recommended to keep input files reasonably sized, as large files may result in long processing times.
VI. Run Backend (Start Server)
- Import the project using IntelliJ IDEA or Eclipse.
- The IDE will automatically load Maven dependencies (initial load may take time).
- Run
tech.qiantong.qknow.server.QKnowApplication.java. After successful startup, access the backend service athttp://localhost:8090. - The following message indicates successful backend startup:
(♥◠‿◠)ノ゙  qKnow Platform started successfully   ლ(´ڡ`ლ)゙
        _  __
   __ _| |/ /_ __   _____      __
  / _` | ' /| '_ \ / _ \ \ /\ / /
 | (_| | . \| | | | (_) \ V  V /
  \__, |_|\_\_| |_|\___/ \_/\_/
|_|Note: Starting only the backend will not display static pages. Proceed to deploy the frontend service.
VII. Run Frontend (Start Frontend Service)
1. Modify Backend Service Port Configuration as Needed
// Vite configuration
server: {
  port: 80,
  host: true,
  open: true,
  proxy: {
    "/dev-api": {
      target: "http://localhost:8090",
      changeOrigin: true,
      rewrite: (p) => p.replace(/^\/dev-api/, ""),
    },
  }
}
2. Start Frontend Service
Step 1: Navigate to Project Directory
First, go to the qknow-ui directory:
# Enter project directory
cd qknow-ui
Step 2: Install Dependencies
Next, install project dependencies. Use the Taobao mirror to speed up downloads:
# Install dependencies (using Taobao mirror recommended)
npm install --registry=https://registry.npmmirror.com
Step 3: Start Development Server
Finally, run the following command to start the frontend development server:
# Start project in development mode
npm run dev
3. Test Frontend Service
Open a browser and navigate to http://localhost. The default login credentials are qKnow/qKnow123. If the login page displays correctly, you can log in successfully, and menus and pages appear as expected, the environment setup is complete.
Tip: Since this project uses a fully separated frontend-backend architecture, both services must be running for full functionality.
We hope this documentation helps you better understand and operate the qKnow Platform project!
![]() Done!
Done!